

Why does this Upgrade Need to Happen for NS-OA Integrations?
Tasks for the NetSuite Administrator
Update the Bundles Below
- SuiteProjects Pro SRP Integration (Bundle ID: 369637) to version 4.0 or later
- SuiteProjects Pro Single Sign-on (Bundle ID: 369619) bundle to version 7.0 or later.
- SuiteProjects Pro Real-time Add-on (Bundle ID 369630) bundle to version 3.0 or later.


Update Role Permissions
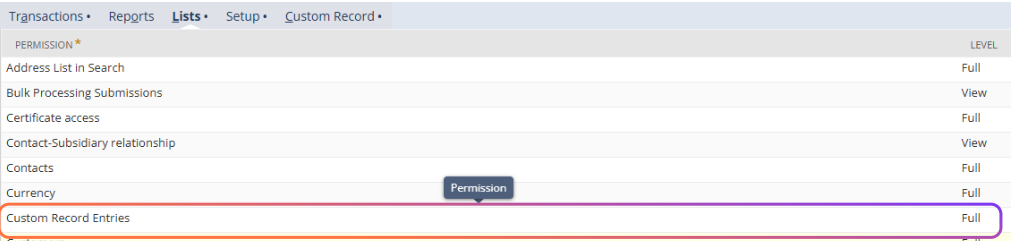
By updating the bundles, it automatically updates the Custom role SuiteProjects Pro Integration Administrator. If you are using your own custom role for the SuiteProjects Pro integration instead of the “SuiteProjects Pro Integration Administrator” role created by the SuiteProjects Pro SRP Integration (Bundle ID 369637) bundle, make sure that this custom role includes the following permissions and permission levels in the Setup secondary subtab:
- OIDC Provider Setup (Full)
- OAuth 2.0 Authorized Applications Management (Full)
- Log in using OAuth 2.0 Access Tokens (Full)
- Certificate management (Full)
- Custom Record Entries (Full)

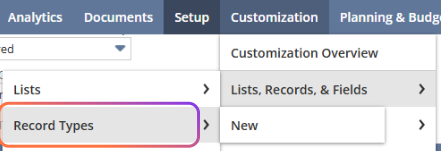
Update the preferences for the NetSuite SuiteProjects Pro integration Custom Record.
- From the Administrator Role, Go to Customization > Lists, Records and Fields > Record Types.
- Click List for the custom record type SuiteProjects Pro: Integration Settings from bundle 369637
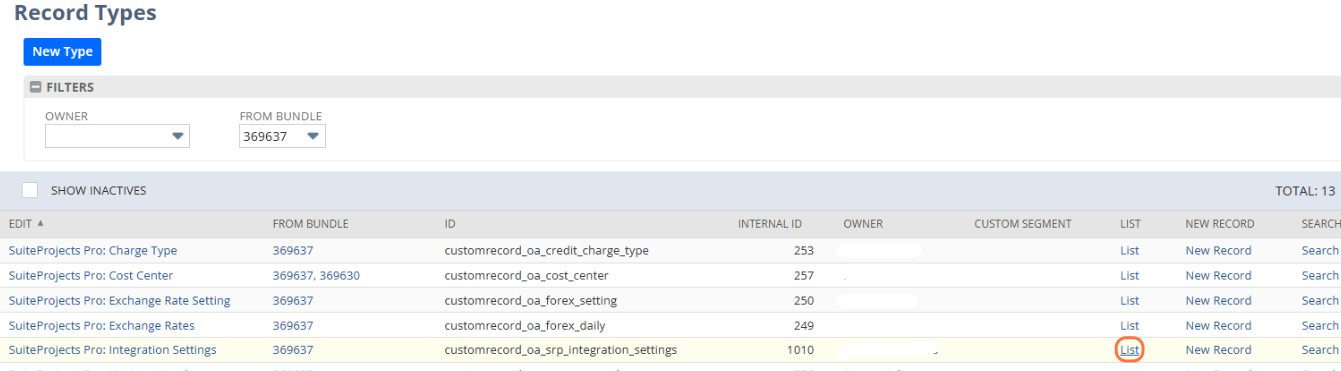
- The SuiteProjects Pro: Integration Settings record list appears and should include one record only (SuiteProjects Pro Integration Settings Record). Click Edit for the record SuiteProjects Pro Integration Settings Record.
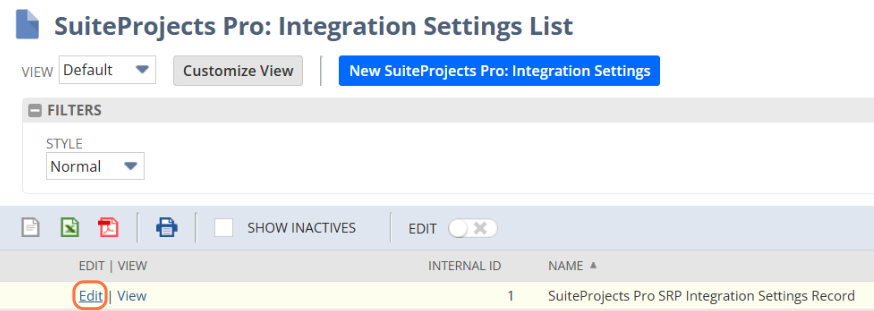
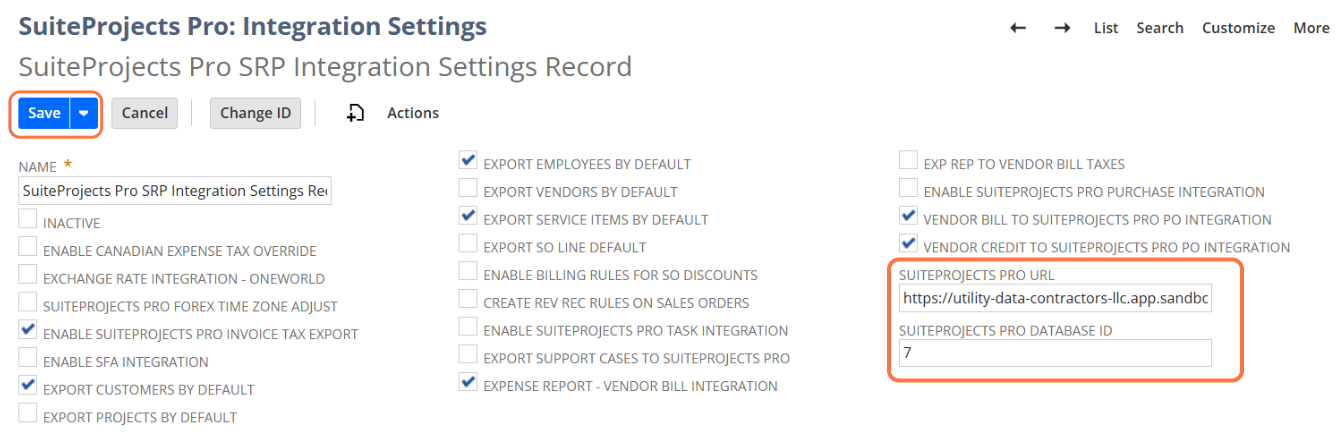
- Enter the following information:
- SuiteProjects Pro URL — The URL for your SuiteProjects Pro account. The URL must include the account-specific domain name for your SuiteProjects Pro account. – To find these, view Provide the OpenAir URL & OpenAir database Id details or contact your OA admin for this information.
- SuiteProjects Pro Database ID — Your unique SuiteProjects Pro account number. To find this, view Provide the OpenAir URL & OpenAir database Id details or contact your OA admin for this information.
- Click Save.
If you are using the SuiteProjects Pro Within NetSuite feature, update the integration configuration for this feature. In NetSuite, enable the OAuth 2.0 and NetSuite as OIDC feature.
- Go to Setup > Company > Setup Tasks > Enable Features.
- Click the SuiteCloud subtab.
- In the Manage Authentication section, check the OAuth 2.0 box. Click I Agree on the SuiteCloud Terms of Service page.
- In the Manage Authentication section, check the NetSuite as OIDC Provider box. Click I Agree on the SuiteCloud Terms of Service page.
- Disable the SAML Single Sign-On
- Click Save.

Create a custom integration record for the SuiteProjects Pro Within NetSuite feature and set it up for the NetSuite SuiteProjects Pro integration to use NetSuite as OIDC Provider for outbound single sign-on.
- Go to Setup > Integration > Integration Management > Manage Integrations > New.

- Use the following settings under the OAuth 2.0 section of the integration record:
- State– Enabled
- Authorization code grant — Check the box. This is required for the NetSuite as OIDC Provider integration to work.
- Redirect URI — Enter one of the following URIs, depending on the type of SuiteProjects Pro account type you are setting up for the integration:
- Production account — https://auth.openair.com/oidc/callback/internal_netsuite_
- Sandbox account — https://auth.sandbox.openair.com/oidc/callback/internal_netsuite
- TBA:Authorization Flow – Uncheck the box
- OAuth2.0 consent policy — You should select Never Ask so that the integration is autoapproved by an administrator. With other settings, users need to authorize the integration before being able to view SuiteProjects Pro within the NetSuite UI.

- ***** Copy the Consumer key / Client ID and Consumer secret / Client secret and store the information in a safe place. For security reasons, the values for Client Credentials are only displayed on the initial setup page. They cannot be retrieved from the system. If you did not retain this information, you will need to reset credentials to obtain new values. You will need this for OpenAir NetSuite Credential Setup in the steps Input NetSuite Connector Credentials.
Give users access to the NetSuite as OIDC Provider integration for the SuiteProjects Pro Within NetSuite feature.
- Go to Setup > Integration > NetSuite as OIDC Provider Setup.

- Click the name of the custom integration record you created on step the SuiteProjects Pro Within NetSuite feature.The Application Settings: window appears.
- On the Entities tab and Employees subtab, check the Select All box to give all users access to the NetSuite as OIDC Provider integration for the SuiteProjects Pro Within NetSuite feature.
- On the Roles tab, check the Select All box to give all roles access to the NetSuite as OIDC Provider integration for the SuiteProjects Pro Within NetSuite feature.
- Click Save.

Update the preferences for the NetSuite SuiteProjects Pro integration.
- Go to Customization > Lists, Records and Fields > Record Types.

- Click List for the custom record type SuiteProjects Pro: Integration Settings.

- The SuiteProjects Pro: Integration Settings record list appears and should include one record only (SuiteProjects Pro Integration Settings Record).Click Edit for the record SuiteProjects Pro Integration Settings Record.

- In the SPP Single Sign-on subtab, check any of the boxes listed in the following table to show the SuiteProjects Pro record as a subtab on the matching record in NetSuite if applicable. The table lists the integrations settings for each of the supported NetSuite record types and the corresponding types of SuiteProjects Pro record shown in the SuiteProjects Pro subtab.
- Real-time SPP Integration subtab, Check the Real-time integration with SuiteProjects Pro box.
- Click Save.


If you currently have the SuiteProjects Pro: Send to SPP user event script (SuiteScript 1.0 version) deployed for real-time record import, switch to SuiteProjects Pro: Send to SPP 2.0 (SuiteScript 2 version) – Click Here
- Go to Customization>Scripting>Scripts and select Edit on the SuiteProjects Pro: Send to SPP 2.0 User Event Script. (From Bundle 369630)

- Go to the deployments subtab and click the Deployed checkbox for all the records that will be sent to OpenAir based on previous settings. Click Save.

- Ensure that the script SuiteProjects Pro: Send to SPP does not have any deployments active.

Task for OpenAir Administrator
Provide the OpenAir URL & OpenAir database Id details
Per the Top Step Article How to Locate Your NetSuite OpenAir Database ID find the OpenAir Databased ID Credentials, follow the steps below
- While Logged into your NetSuite OpenAir Account, click on your initials at the top right of the page, then click Support.

- Click the here button where it states at the bottom of the page “If SuiteAnswers is unavailable and you need to contact Support, click here.”

- Scroll Down to the bottom to find your SuiteProjects Pro Account id. Take Note of this.

Provide the OpenAir URL Details
You will see it in the address bar of the browser after you sign in. The sign-in page you use to access SuiteProjects Pro is different for each type of account. The address bar of your browser shows a different URL after you sign in, depending on the type of account you signed in to. Your account URL includes a domain name that is specific to your account. The following lists the sign-in page and account-specific domain name format for each type of account. The account-specific domain name includes a unique account identifier which is typically assigned based on the Company ID for your account.
- Account Type: Production
- Sign-in Page – https://auth.netsuitesuiteprojectspro.com/login
- Account Specific Domain – .app.netsuitesuiteprojectspro.com/
- Account Type: Sandbox
- Sign-in Page – https://auth.sandbox.netsuitesuiteprojectspro.com/login
- Account Specific Domain – .app.sandbox.netsuitesuiteprojectspro.com
Create Real-Time Import Certificate
SuiteProjects Pro uses certificates to validate real-time record import requests. Certificates are valid for a finite period. To generate a new certificate for real-time record imports:
- In SuiteProjects Pro, go to Administration > NetSuite Connector.


- Click the Tips button on the top right, then click Generate new real-time import certificate. SuiteProjects Pro generates a new certificate, uploads it in the custcertificate_oa_realtime certificate record in NetSuite, and saves it in SuiteProjects Pro after it is successfully uploaded in NetSuite.

Input NetSuite Connector Credentials
- In OpenAir go to Administration > NetSuite Connector > Credentials
- Click the Tips utility button, then NetSuite Connector Administration.

- Check the Use OAuth 2.0 for NetSuite Single Sign-On Integration and Real-Time Record Import (Configuration Changes Required Before Enabling – See Documentation) box under the Additional Integrations section.

- Click Save. Click Close to return to the NetSuite Connector>Credentials tab.
- In the Credentials tab, under NetSuite OAuth 2.0 credentials, enter the Consumer key and Consumer secret.

Update OpenAir User Records Permissions
You will update any user records that you wish to have the SuiteProjects Pro Access within NetSuite
- Go to the Administration>Users in OpenAir
- Find User, Click Edit in record
- Under General Settings, check the Allow NetSuite Single Sign-One box

Your configuration is now complete and you can now test/validate your NS SPP Integration!
How TAC Can Help
TAC can simplify the transition from SuiteSignOn to modern OAuth-based integrations by guiding you through bundle updates, role adjustments, and configuration changes. Our team ensures your setup is tested in a sandbox, errors are resolved before going live, and best practices are followed for long-term security and stability helping you achieve a smooth, reliable NetSuite <> OpenAir integration without workflow disruptions. Partner with TAC to save time, reduce risk, and ensure your upgrade is done right the first time.


