

The N/documentCapture module enables developers to extract structured data from supported documents and images. It automatically identifies text, key-value pairs, and tables, while classifying documents by type. This structured output drives workflows, conditional logic, and record creation based on document contents — enabling intelligent routing and downstream processing directly within NetSuite.
In this tutorial, we’ll explore documentCapture methods, analyze the returned data, and extract meaningful insights from documents.
Pre-requisites
This tutorial assumes familiarity with SuiteScript 2.x, including how to create and deploy suitelets. If you’re new to SuiteScript development, review NetSuite’s SuiteScript documentation before continuing. You’ll also need a code editor. You can download Visual Studio Code for free.
Setup
We’ll start by setting up a suitelet that allows us to select a file from a specific folder in the file cabinet. Below is a zip file with the starter suitelet as well as all of the other code used in this tutorial. The starter script is named tac_sl2_documentCapture_tutorial.js. There is a script for each step denoted with ‘_1’ and so on.
- Download and extract this zip file to a folder on your computer: dc_tutorial_scripts.zip
- Go to your SuiteScripts folder in the NetSuite file cabinet and upload the file named tac_sl2_documentCapture_tutorial.js from the folder you just extracted.
- Create a new script record and select the file you just uploaded. Give it whatever Name and ID you want. Don’t save yet.
- Open the Parameters tab on the script record and add a new parameter.
- In the Label field enter ‘FolderId’. In the ID field enter ‘_folderid’. Under Type select ‘Integer Number’. Click the Add button.

- Go to the Deployments tab and enter in a Title and ID. Click Add.
- Save the script record and open a new browser tab.
- Go back to the file cabinet and create a new folder wherever you want. This is where we will store the documents that we’ll be using in this tutorial. You can name the folder whatever you want.
- Download this zip file: dc_tutorial_documents.zip
- Inside the folder in the NetSuite file cabinet that you just created, use the Advanced Add button to add the dc_tutorial_documents.zip to your folder.
- Navigate up one level to get out of that folder using the icon in the top left corner.

- Now you should see your folder. Copy the folder’s internal id.

- Select the browser tab that still has the script record open and select the script deployment from the Deployments tab.
- On the script deployment record click Edit and navigate to the Parameters tab.
- Here is where you will paste the internal id of your folder so we can use this in the script to get the files from the correct folder in the file cabinet.

- Now open your suitelet in a new tab using the URL link in your suitelet deployment record.

- Your suitelet should look like this when you click into the select field.

AI Usage Units: AI Preferences
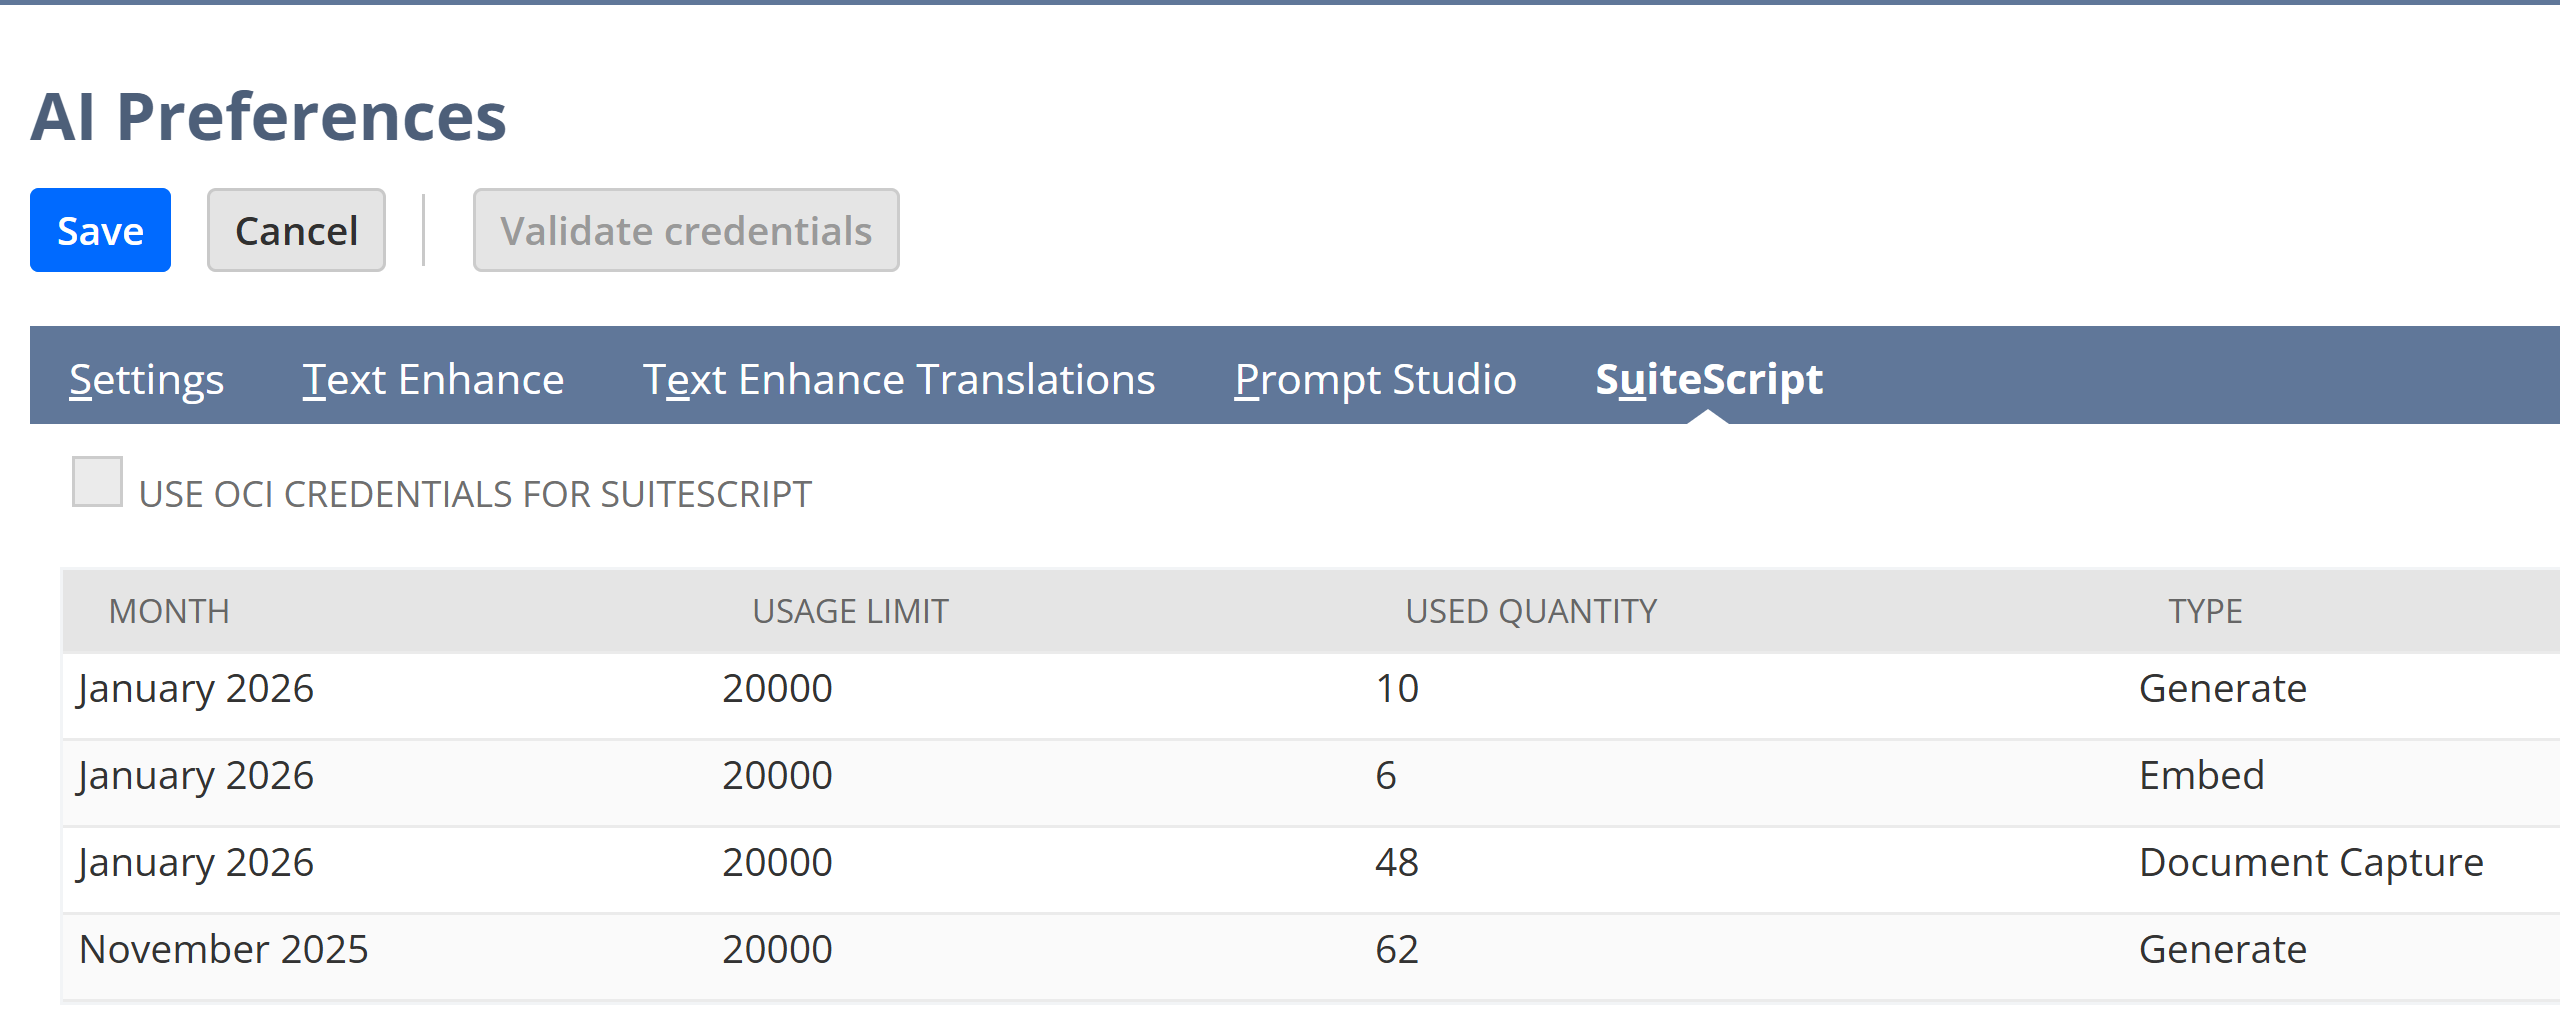
Before exploring SuiteScript AI modules, it’s important to understand that NetSuite provides a pool of free monthly usage. Each successful AI operation consumes from this pool, which resets at the beginning of each month. You can check this pool through the suitescript method documentCapture.getRemainingFreeUsage() and through the UI. To find these limits in the UI go to Setup > Company > AI Preferences. From here click on the SuiteScript tab. When you start using SuiteScript AI modules you’ll see the usage broken out by type and month here. The free usage limit is 2000. If your company wants unlimited usage, you’ll need to set up an Oracle Cloud account with Oracle Generative AI service (for N/llm) or Oracle Cloud Infrastructure Document Understanding service (for N/documentCapture) or both. For this tutorial we’ll stay below 10 usage units.
Step 1: documentCapture.documentToText(options)
We’ll start with the documentToText() method, which extracts a plain text string from PDF files.
In your script, locate the else statement where fileId is defined. After getting the fileId we’ll load the file and then pass the file object into the documentToText() method. Now in the context.response.write() method replace fileId with the extractedData.
} else {
const fileId = context.request.parameters.custpage_file;
// STEP 1 - Load the file using fileId
const fileObj = file.load(fileId);
// add documentCapture.documentToText(options)
const extractedData = documentCapture.documentToText({
file: fileObj
});
context.response.write('<html><body><pre>' +
// change fileId to extractedData
extractedData +
'</pre><br />' + '<button onclick="history.back()">Go Back</button>' ); } </div> </div> </div> <div class="elementor-element elementor-element-0bfa456 elementor-widget elementor-widget-text-editor" data-id="0bfa456" data-element_type="widget" data-e-type="widget" data-widget_type="text-editor.default"> <div class="elementor-widget-container"> <p>Upload the updated script to your SuiteScripts file cabinet folder, select ‘Training Schedule.pdf’ in your suitelet file select, and click Submit.</p><p>You should see something like the screenshot below. Go to the folder where you are storing the documents being read by the suitelet. Click on ‘Training Schedule.pdf’ to open it and compare the original document to the text extracted in the suitelet. Notice how the text includes a separate line for each field and table cell that appears on the PDF document. What if we want to get the text as it appears within the structure of the document? For that we’ll need to use the documentToStructure() method. We’ll cover that next.</p> </div> </div> <div class="elementor-element elementor-element-e698f41 elementor-widget__width-initial elementor-widget elementor-widget-image" data-id="e698f41" data-element_type="widget" data-e-type="widget" data-widget_type="image.default"> <div class="elementor-widget-container"> <a href="https://www.tacsolutionsgroup.com/wp-content/uploads/2026/02/documentToText_example.png" data-elementor-open-lightbox="yes" data-elementor-lightbox-title="documentToText_example" data-e-action-hash="#elementor-action%3Aaction%3Dlightbox%26settings%3DeyJpZCI6MTM4NCwidXJsIjoiaHR0cHM6XC9cL3d3dy50YWNzb2x1dGlvbnNncm91cC5jb21cL3dwLWNvbnRlbnRcL3VwbG9hZHNcLzIwMjZcLzAyXC9kb2N1bWVudFRvVGV4dF9leGFtcGxlLnBuZyJ9"> <img width="744" height="567" alt="" sizes="(max-width: 744px) 100vw, 744px" nitro-lazy-srcset="https://cdn-ilbkelb.nitrocdn.com/EyckMDRkyFDdypQNijObMLPmiSRGjmSI/assets/images/optimized/rev-8bf6a97/www.tacsolutionsgroup.com/wp-content/uploads/2026/02/documentToText_example.png 744w, https://cdn-ilbkelb.nitrocdn.com/EyckMDRkyFDdypQNijObMLPmiSRGjmSI/assets/images/optimized/rev-8bf6a97/www.tacsolutionsgroup.com/wp-content/uploads/2026/02/documentToText_example-300x229.png 300w" nitro-lazy-src="https://cdn-ilbkelb.nitrocdn.com/EyckMDRkyFDdypQNijObMLPmiSRGjmSI/assets/images/optimized/rev-8bf6a97/www.tacsolutionsgroup.com/wp-content/uploads/2026/02/documentToText_example.png" class="attachment-full size-full wp-image-1384 nitro-lazy" decoding="async" nitro-lazy-empty id="NzE0OjQ3Nw==-1" data-nitro-empty-id="NzE0OjQ3Nw==-1" src="data:image/svg+xml;base64,PHN2ZyB2aWV3Qm94PSIwIDAgNzQ0IDU2NyIgd2lkdGg9Ijc0NCIgaGVpZ2h0PSI1NjciIHhtbG5zPSJodHRwOi8vd3d3LnczLm9yZy8yMDAwL3N2ZyI+PC9zdmc+" /> </a> </div> </div> </div> </div> <div class="elementor-element elementor-element-8e9b331 e-con-full e-flex e-con e-parent" data-id="8e9b331" data-element_type="container" data-e-type="container" data-settings="{"_ha_eqh_enable":false}"> <div class="elementor-element elementor-element-73dbfe8 e-con-full e-flex e-con e-child" data-id="73dbfe8" data-element_type="container" data-e-type="container" data-settings="{"_ha_eqh_enable":false}"> <div class="elementor-element elementor-element-d644485 elementor-widget elementor-widget-heading" data-id="d644485" data-element_type="widget" data-e-type="widget" data-widget_type="heading.default"> <div class="elementor-widget-container"> <h2 class="elementor-heading-title elementor-size-default">Step 2: documentCapture.documentToStructure(options) </h2> </div> </div> <div class="elementor-element elementor-element-0961d95 elementor-widget elementor-widget-text-editor" data-id="0961d95" data-element_type="widget" data-e-type="widget" data-widget_type="text-editor.default"> <div class="elementor-widget-container"> <p>Unlike documentToText(), the documentToStructure() method supports JPG, PNG, and TIFF files as well as PDFs. There’s also a parameter called <strong>features</strong> that you can use to specify the document features you want to extract. We’ll start with using the TEXT_EXTRACTION feature. Just replace the documentToText() method with the documentToStructure() method as shown below.</p> </div> </div> <div class="elementor-element elementor-element-e812e46 elementor-widget elementor-widget-code-highlight" data-id="e812e46" data-element_type="widget" data-e-type="widget" data-widget_type="code-highlight.default"> <div class="elementor-widget-container"> <div class="prismjs-okaidia copy-to-clipboard "> <pre data-line="" class="highlight-height language-javascript ">
<code readonly="true" class="language-javascript">
<xmp> // STEP 2 - replace documentToText() with documentToStructure and use the TEXT_EXTRACTION feature
const extractedData = documentCapture.documentToStructure({
file: fileObj,
features: [
documentCapture.Feature.TEXT_EXTRACTION
]
});
context.response.write('<html><body><pre>' +
// convert extractedData to a string
JSON.stringify(extractedData) +
'</pre><br />' + '<button onclick="history.back()" class="nitro-lazy">Go Back</button>' ); </div> </div> </div> <div class="elementor-element elementor-element-1633905 elementor-widget elementor-widget-text-editor" data-id="1633905" data-element_type="widget" data-e-type="widget" data-widget_type="text-editor.default"> <div class="elementor-widget-container"> <p>Update the script file again in the file cabinet and open the suitelet. A ‘Go Back’ button is included in the html on the suitelet response page, so either use that to go back to the suitelet form or use the browser back button. Select ‘Training Schedule.pdf’ again and submit. You should see something like the image below. If you scroll to the right you’ll see that there is a pages object with an array for “words” and each word is an object with keys named “text” and “confidence”. If you scroll all the way to the right you’ll also find keys for “tables” and “fields” with empty arrays. We are only extracting text so we are only seeing the array for “words”.</p> </div> </div> <div class="elementor-element elementor-element-56f1618 elementor-widget__width-initial elementor-widget elementor-widget-image" data-id="56f1618" data-element_type="widget" data-e-type="widget" data-widget_type="image.default"> <div class="elementor-widget-container"> <a href="https://www.tacsolutionsgroup.com/wp-content/uploads/2026/02/document_object_no_line_breaks.png" data-elementor-open-lightbox="yes" data-elementor-lightbox-title="document_object_no_line_breaks" data-e-action-hash="#elementor-action%3Aaction%3Dlightbox%26settings%3DeyJpZCI6MTM4MywidXJsIjoiaHR0cHM6XC9cL3d3dy50YWNzb2x1dGlvbnNncm91cC5jb21cL3dwLWNvbnRlbnRcL3VwbG9hZHNcLzIwMjZcLzAyXC9kb2N1bWVudF9vYmplY3Rfbm9fbGluZV9icmVha3MucG5nIn0%3D"> <img width="1443" height="50" alt="document object no line breaks" sizes="(max-width: 1443px) 100vw, 1443px" nitro-lazy-srcset="https://cdn-ilbkelb.nitrocdn.com/EyckMDRkyFDdypQNijObMLPmiSRGjmSI/assets/images/optimized/rev-8bf6a97/www.tacsolutionsgroup.com/wp-content/uploads/2026/02/document_object_no_line_breaks.png 1443w, https://cdn-ilbkelb.nitrocdn.com/EyckMDRkyFDdypQNijObMLPmiSRGjmSI/assets/images/optimized/rev-8bf6a97/www.tacsolutionsgroup.com/wp-content/uploads/2026/02/document_object_no_line_breaks-300x10.png 300w, https://cdn-ilbkelb.nitrocdn.com/EyckMDRkyFDdypQNijObMLPmiSRGjmSI/assets/images/optimized/rev-8bf6a97/www.tacsolutionsgroup.com/wp-content/uploads/2026/02/document_object_no_line_breaks-1024x35.png 1024w, https://cdn-ilbkelb.nitrocdn.com/EyckMDRkyFDdypQNijObMLPmiSRGjmSI/assets/images/optimized/rev-8bf6a97/www.tacsolutionsgroup.com/wp-content/uploads/2026/02/document_object_no_line_breaks-768x27.png 768w" nitro-lazy-src="https://cdn-ilbkelb.nitrocdn.com/EyckMDRkyFDdypQNijObMLPmiSRGjmSI/assets/images/optimized/rev-8bf6a97/www.tacsolutionsgroup.com/wp-content/uploads/2026/02/document_object_no_line_breaks.png" class="attachment-full size-full wp-image-1383 nitro-lazy" decoding="async" nitro-lazy-empty id="NzczOjc1Mw==-1" data-nitro-empty-id="NzczOjc1Mw==-1" src="data:image/svg+xml;base64,PHN2ZyB2aWV3Qm94PSIwIDAgMTQ0MyA1MCIgd2lkdGg9IjE0NDMiIGhlaWdodD0iNTAiIHhtbG5zPSJodHRwOi8vd3d3LnczLm9yZy8yMDAwL3N2ZyI+PC9zdmc+" /> </a> </div> </div> <div class="elementor-element elementor-element-3ab385a elementor-widget elementor-widget-text-editor" data-id="3ab385a" data-element_type="widget" data-e-type="widget" data-widget_type="text-editor.default"> <div class="elementor-widget-container"> <p>Now that we can see “confidence” inside of the documentCapture.Document object we can shed some light on what that means. The <strong>confidence</strong> property tells us how certain the document capture service is about the text it extracted for each word. It’s a number between 0 and 1 that represents a percent – so a confidence of 1 like we see here means the service is 100% sure it read the word correctly.</p><p>This is useful when you need to decide which extracted words to trust. For instance, if accuracy is critical for your use case, you might only accept words with a confidence above 0.9 (90%). This helps filter out any questionable extractions before they make it into your workflow.</p> </div> </div> </div> </div> <div class="elementor-element elementor-element-ba42dd9 e-con-full e-flex e-con e-parent" data-id="ba42dd9" data-element_type="container" data-e-type="container" data-settings="{"_ha_eqh_enable":false}"> <div class="elementor-element elementor-element-1435e03 e-con-full e-flex e-con e-child" data-id="1435e03" data-element_type="container" data-e-type="container" data-settings="{"_ha_eqh_enable":false}"> <div class="elementor-element elementor-element-75c747b elementor-widget elementor-widget-heading" data-id="75c747b" data-element_type="widget" data-e-type="widget" data-widget_type="heading.default"> <div class="elementor-widget-container"> <h2 class="elementor-heading-title elementor-size-default">Step 3: TABLE_EXTRACTION feature</h2> </div> </div> <div class="elementor-element elementor-element-b3b2b5a elementor-widget elementor-widget-text-editor" data-id="b3b2b5a" data-element_type="widget" data-e-type="widget" data-widget_type="text-editor.default"> <div class="elementor-widget-container"> <p>At this point we’ve seen what words look like when extracted using the documentToStructure() method but we still haven’t seen the text within the table structure that we know is in the original PDF file. To do that we’ll swap out ‘TEXT_EXTRACTION’ in the features parameter and replace it with ‘TABLE_EXTRACTION’.</p> </div> </div> <div class="elementor-element elementor-element-50f4c92 elementor-widget elementor-widget-code-highlight" data-id="50f4c92" data-element_type="widget" data-e-type="widget" data-widget_type="code-highlight.default"> <div class="elementor-widget-container"> <div class="prismjs-okaidia copy-to-clipboard "> <pre data-line="" class="highlight-height language-javascript ">
<code readonly="true" class="language-javascript">
<xmp> // STEP 3 - replace TEXT_EXTRACTION with TABLE_EXTRACTION
const extractedData = documentCapture.documentToStructure({
file: fileObj,
features: [
documentCapture.Feature.TABLE_EXTRACTION
]
});
We now know the general structure of the object so we can break out the object members we want to inspect and make them easier to read. We’ll break out the words, tables, and fields with line breaks and labels so we know exactly what object we’re looking at. Now update your suitelet file, go back to the file selection, select ‘Training Schedule.pdf’, and submit.
context.response.write('<html><body><pre>' +
// make the extractedData object easier to read
'<strong>Words:</strong>\n' +
JSON.stringify(extractedData.pages[0].words, null, 2) +
'\n\n<strong>Tables:</strong>\n' +
JSON.stringify(extractedData.pages[0].tables, null, 2) +
'\n\n<strong>Fields:</strong>\n' +
JSON.stringify(extractedData.pages[0].fields, null, 2) +
'</pre><br />' + '<button onclick="history.back()">Go Back</button>' ); </div> </div> </div> <div class="elementor-element elementor-element-5cd7a66 elementor-widget elementor-widget-text-editor" data-id="5cd7a66" data-element_type="widget" data-e-type="widget" data-widget_type="text-editor.default"> <div class="elementor-widget-container"> <p>At the top of the page the words object is still there even though we didn’t enter TEXT_EXTRACTION. That’s because TEXT_EXTRACTION is always there by default. If you don’t specify any features, you will get TEXT_EXTRACTION and TABLE_EXTRACTION, and as we’ve seen, if you only enter TEXT_EXTRACTION, you will only get the words object member.</p> </div> </div> <div class="elementor-element elementor-element-022e40f elementor-widget__width-initial elementor-widget elementor-widget-image" data-id="022e40f" data-element_type="widget" data-e-type="widget" data-widget_type="image.default"> <div class="elementor-widget-container"> <a href="https://www.tacsolutionsgroup.com/wp-content/uploads/2026/02/step_3_words.png" data-elementor-open-lightbox="yes" data-elementor-lightbox-title="step_3_words" data-e-action-hash="#elementor-action%3Aaction%3Dlightbox%26settings%3DeyJpZCI6MTM5MiwidXJsIjoiaHR0cHM6XC9cL3d3dy50YWNzb2x1dGlvbnNncm91cC5jb21cL3dwLWNvbnRlbnRcL3VwbG9hZHNcLzIwMjZcLzAyXC9zdGVwXzNfd29yZHMucG5nIn0%3D"> <img width="269" height="329" alt="step 3 words" sizes="(max-width: 269px) 100vw, 269px" nitro-lazy-srcset="https://cdn-ilbkelb.nitrocdn.com/EyckMDRkyFDdypQNijObMLPmiSRGjmSI/assets/images/optimized/rev-8bf6a97/www.tacsolutionsgroup.com/wp-content/uploads/2026/02/step_3_words.png 269w, https://cdn-ilbkelb.nitrocdn.com/EyckMDRkyFDdypQNijObMLPmiSRGjmSI/assets/images/optimized/rev-8bf6a97/www.tacsolutionsgroup.com/wp-content/uploads/2026/02/step_3_words-245x300.png 245w" nitro-lazy-src="https://cdn-ilbkelb.nitrocdn.com/EyckMDRkyFDdypQNijObMLPmiSRGjmSI/assets/images/optimized/rev-8bf6a97/www.tacsolutionsgroup.com/wp-content/uploads/2026/02/step_3_words.png" class="attachment-full size-full wp-image-1392 nitro-lazy" decoding="async" nitro-lazy-empty id="ODQxOjQ1OQ==-1" data-nitro-empty-id="ODQxOjQ1OQ==-1" src="data:image/svg+xml;base64,PHN2ZyB2aWV3Qm94PSIwIDAgMjY5IDMyOSIgd2lkdGg9IjI2OSIgaGVpZ2h0PSIzMjkiIHhtbG5zPSJodHRwOi8vd3d3LnczLm9yZy8yMDAwL3N2ZyI+PC9zdmc+" /> </a> </div> </div> <div class="elementor-element elementor-element-4d0d502 elementor-widget elementor-widget-text-editor" data-id="4d0d502" data-element_type="widget" data-e-type="widget" data-widget_type="text-editor.default"> <div class="elementor-widget-container"> <p>Scroll down further and we see the Tables object. It contains the number of rows and columns as well as an overall confidence percent for the table. The headerRows and bodyRows are all broken out with their individual cells, the text from the cell, and a confidence percent for each one.</p> </div> </div> <div class="elementor-element elementor-element-e02f5fb elementor-widget__width-initial elementor-widget elementor-widget-image" data-id="e02f5fb" data-element_type="widget" data-e-type="widget" data-widget_type="image.default"> <div class="elementor-widget-container"> <a href="https://www.tacsolutionsgroup.com/wp-content/uploads/2026/02/step_3_table_header.png" data-elementor-open-lightbox="yes" data-elementor-lightbox-title="step_3_table_header" data-e-action-hash="#elementor-action%3Aaction%3Dlightbox%26settings%3DeyJpZCI6MTM5MSwidXJsIjoiaHR0cHM6XC9cL3d3dy50YWNzb2x1dGlvbnNncm91cC5jb21cL3dwLWNvbnRlbnRcL3VwbG9hZHNcLzIwMjZcLzAyXC9zdGVwXzNfdGFibGVfaGVhZGVyLnBuZyJ9"> <img width="445" height="745" alt="step 3 table header" sizes="(max-width: 445px) 100vw, 445px" nitro-lazy-srcset="https://cdn-ilbkelb.nitrocdn.com/EyckMDRkyFDdypQNijObMLPmiSRGjmSI/assets/images/optimized/rev-8bf6a97/www.tacsolutionsgroup.com/wp-content/uploads/2026/02/step_3_table_header.png 445w, https://cdn-ilbkelb.nitrocdn.com/EyckMDRkyFDdypQNijObMLPmiSRGjmSI/assets/images/optimized/rev-8bf6a97/www.tacsolutionsgroup.com/wp-content/uploads/2026/02/step_3_table_header-179x300.png 179w" nitro-lazy-src="https://cdn-ilbkelb.nitrocdn.com/EyckMDRkyFDdypQNijObMLPmiSRGjmSI/assets/images/optimized/rev-8bf6a97/www.tacsolutionsgroup.com/wp-content/uploads/2026/02/step_3_table_header.png" class="attachment-full size-full wp-image-1391 nitro-lazy" decoding="async" nitro-lazy-empty id="ODUxOjQ4Nw==-1" data-nitro-empty-id="ODUxOjQ4Nw==-1" src="data:image/svg+xml;base64,PHN2ZyB2aWV3Qm94PSIwIDAgNDQ1IDc0NSIgd2lkdGg9IjQ0NSIgaGVpZ2h0PSI3NDUiIHhtbG5zPSJodHRwOi8vd3d3LnczLm9yZy8yMDAwL3N2ZyI+PC9zdmc+" /> </a> </div> </div> <div class="elementor-element elementor-element-0054368 elementor-widget__width-initial elementor-widget elementor-widget-image" data-id="0054368" data-element_type="widget" data-e-type="widget" data-widget_type="image.default"> <div class="elementor-widget-container"> <a href="https://www.tacsolutionsgroup.com/wp-content/uploads/2026/02/step_3_table_body.png" data-elementor-open-lightbox="yes" data-elementor-lightbox-title="step_3_table_body" data-e-action-hash="#elementor-action%3Aaction%3Dlightbox%26settings%3DeyJpZCI6MTM5MCwidXJsIjoiaHR0cHM6XC9cL3d3dy50YWNzb2x1dGlvbnNncm91cC5jb21cL3dwLWNvbnRlbnRcL3VwbG9hZHNcLzIwMjZcLzAyXC9zdGVwXzNfdGFibGVfYm9keS5wbmcifQ%3D%3D"> <img width="577" height="810" alt="step 3 table body" sizes="(max-width: 577px) 100vw, 577px" nitro-lazy-srcset="https://cdn-ilbkelb.nitrocdn.com/EyckMDRkyFDdypQNijObMLPmiSRGjmSI/assets/images/optimized/rev-8bf6a97/www.tacsolutionsgroup.com/wp-content/uploads/2026/02/step_3_table_body.png 577w, https://cdn-ilbkelb.nitrocdn.com/EyckMDRkyFDdypQNijObMLPmiSRGjmSI/assets/images/optimized/rev-8bf6a97/www.tacsolutionsgroup.com/wp-content/uploads/2026/02/step_3_table_body-214x300.png 214w" nitro-lazy-src="https://cdn-ilbkelb.nitrocdn.com/EyckMDRkyFDdypQNijObMLPmiSRGjmSI/assets/images/optimized/rev-8bf6a97/www.tacsolutionsgroup.com/wp-content/uploads/2026/02/step_3_table_body.png" class="attachment-full size-full wp-image-1390 nitro-lazy" decoding="async" nitro-lazy-empty id="ODU3OjQ3OQ==-1" data-nitro-empty-id="ODU3OjQ3OQ==-1" src="data:image/svg+xml;base64,PHN2ZyB2aWV3Qm94PSIwIDAgNTc3IDgxMCIgd2lkdGg9IjU3NyIgaGVpZ2h0PSI4MTAiIHhtbG5zPSJodHRwOi8vd3d3LnczLm9yZy8yMDAwL3N2ZyI+PC9zdmc+" /> </a> </div> </div> <div class="elementor-element elementor-element-aa39ed9 elementor-widget elementor-widget-text-editor" data-id="aa39ed9" data-element_type="widget" data-e-type="widget" data-widget_type="text-editor.default"> <div class="elementor-widget-container"> <p>We’ve seen the text and tables extracted, but what if we want to distinguish the label from the text of a field on a document? That’s what we’re going to cover next.</p> </div> </div> </div> </div> <div class="elementor-element elementor-element-ccb32ee e-con-full e-flex e-con e-parent" data-id="ccb32ee" data-element_type="container" data-e-type="container" data-settings="{"_ha_eqh_enable":false}"> <div class="elementor-element elementor-element-bf062e2 e-con-full e-flex e-con e-child" data-id="bf062e2" data-element_type="container" data-e-type="container" data-settings="{"_ha_eqh_enable":false}"> <div class="elementor-element elementor-element-b72ff44 elementor-widget elementor-widget-heading" data-id="b72ff44" data-element_type="widget" data-e-type="widget" data-widget_type="heading.default"> <div class="elementor-widget-container"> <h2 class="elementor-heading-title elementor-size-default">Step 4. FIELD_EXTRACTION and documentType </h2> </div> </div> <div class="elementor-element elementor-element-5c32513 elementor-widget elementor-widget-text-editor" data-id="5c32513" data-element_type="widget" data-e-type="widget" data-widget_type="text-editor.default"> <div class="elementor-widget-container"> <p>Up until now we have not used the documentType parameter. The default value for documentType is OTHERS, which is an unspecified document type, but to use FIELD_EXTRACTION we’ll need to choose one of the supported document types. When we tell documentToStructure() what type of document we’re working with, it can use models that have been specifically trained on that document type, which usually produces better and more accurate results.</p><p>We’re going to add the documentType parameter and set it to documentCapture.DocumentType.INVOICE. Then we’re going to add documentCapture.Feature.FIELD_EXTRACTION to the array for the features parameter.</p> </div> </div> <div class="elementor-element elementor-element-6508b48 elementor-widget elementor-widget-code-highlight" data-id="6508b48" data-element_type="widget" data-e-type="widget" data-widget_type="code-highlight.default"> <div class="elementor-widget-container"> <div class="prismjs-okaidia copy-to-clipboard "> <pre data-line="" class="highlight-height language-javascript ">
<code readonly="true" class="language-javascript">
<xmp> // STEP 4 - add documentType INVOICE and feature FIELD_EXTRACTION
const extractedData = documentCapture.documentToStructure({
file: fileObj,
documentType: documentCapture.DocumentType.INVOICE,
features: [
documentCapture.Feature.TABLE_EXTRACTION,
documentCapture.Feature.FIELD_EXTRACTION
]
});
Update the script file, go to the suitelet, select ‘Invoice.pdf’ from the file select field, and click submit. Scroll down until you see ‘Fields’. Here we see that confidence is null for every field value object. That’s not because there is no confidence in the text. That’s because the confidence for the text is still stored in the words object.
If we look at the label we do see a high confidence. The confidence in fields is referring to the field labels and not the value inside of the fields. There’s also a type property that shows the type of field.

We’ve only captured data from PDFs so far but what if we wanted to capture data from an image like a photo of a receipt such as what a user would upload for an expense report? Let’s take a look at that next.
Step 5: documentToStructure() with a JPG
The only thing we need to do for this step is change INVOICE to receipt. Update your script file, select ‘restaurant receipt.jpg’ from the file select field in your suitelet, and submit.
       // STEP 5 - change INVOICE to RECEIPT
        const extractedData = documentCapture.documentToStructure({
            file: fileObj,
            documentType: documentCapture.DocumentType.RECEIPT,
            features: [
                documentCapture.Feature.TABLE_EXTRACTION,
                documentCapture.Feature.FIELD_EXTRACTION
            ]
        });
We’re getting values for words, tables, and fields from this receipt. The confidence levels are almost all well above 0.9 except for the confidence on the table structure. That’s pretty good for a photo of a receipt from a taco vendor. If we compare it to the image, all of the text was gathered and the quantity, items, prices, and totals are all correct.


We have learned how the N/documentCapture module can be used to extract text as well as the overall structure around that text from a document. What if we want to use this information, for example, to enter an expense report into NetSuite? How can we collect data from receipts and make sense of it when the format we receive it in is so widely varied? That’s what we’ll discuss next when we start working with the N/llm module.
Step 6: Using N/llm with N/documentCapture
LLM stands for Large Language Model. It’s basically the AI technology behind tools like ChatGPT – trained on huge amounts of text to understand language patterns and generate intelligent responses. In NetSuite, the N/llm module lets you tap into this AI power directly in your scripts. Instead of writing complex parsing logic, you can just ask the AI to analyze documents, extract information, categorize data, or answer questions about content – and it figures out how to do it based on what it’s learned.
We’re going to be using the generateText() method from the N/llm module. First we’ll just do something simple to get an idea of what this method can do for us. The first parameter we’re using is prompt. The prompt parameter is the core of how you communicate with NetSuite’s AI module – it’s essentially your instructions or question to the AI model.
The next parameter we’re using is the documents parameter. While the prompt tells the AI what to do, the documents parameter provides the context or source material the AI should reference when generating its response. The documents parameter is an array of document objects that give the LLM additional context beyond what’s in your prompt. Think of it as handing the AI a stack of reference materials before asking it a question. We’ll pass it the fileId of the document we’ve been using in documentCapture. Then we’ll pass just the text from our extractedData object by using the getText() method.
In the response.write function we’ll put the text from the llm.Response object. Update your script file, select ‘restaurant receipt.jpg’ from the file select field in your suitelet, and submit.
// Step 6 - add llm.generateText() method
const llmResponse = llm.generateText({
prompt: "What is this receipt for?",
documents: [{
id: 'fileId',
data: extractedData.getText()
}]
});
context.response.write('<html><body><pre>' +
// add the text from the llm generateText response
llmResponse.text +
'</pre><br />' + '<button onclick="history.back()">Go Back</button>' ); </div> </div> </div> <div class="elementor-element elementor-element-3696bc1 elementor-widget elementor-widget-text-editor" data-id="3696bc1" data-element_type="widget" data-e-type="widget" data-widget_type="text-editor.default"> <div class="elementor-widget-container"> <p>You might have different results but probably fairly similar to this:</p> </div> </div> <div class="elementor-element elementor-element-1d13210 elementor-alert-info elementor-widget elementor-widget-alert" data-id="1d13210" data-element_type="widget" data-e-type="widget" data-widget_type="alert.default"> <div class="elementor-widget-container"> <div class="elementor-alert" role="alert"> <span class="elementor-alert-description">This receipt is for four tacos and one supreme from 12/13/2025. The tacos were Asada, Chorizo, Asada and Pastor and the total cost was $21.16.</span> </div> </div> </div> <div class="elementor-element elementor-element-b0945f7 elementor-widget elementor-widget-text-editor" data-id="b0945f7" data-element_type="widget" data-e-type="widget" data-widget_type="text-editor.default"> <div class="elementor-widget-container"> <p>The response we received is accurate but vague. The prompt we gave the generateText() method was also vague. The art of using any AI tool is learning how to write detailed and specific prompts. Let’s try writing a better prompt this time. There isn’t a separate script file for this change but the only change we’re going to make is to change what the prompt says in the generateText() method. Let’s be more specific now. Update the prompt with the one below. Update your script file, select ‘restaurant receipt.jpg’ from the file select field in your suitelet, and submit.</p> </div> </div> <div class="elementor-element elementor-element-95d9cd7 elementor-widget elementor-widget-code-highlight" data-id="95d9cd7" data-element_type="widget" data-e-type="widget" data-widget_type="code-highlight.default"> <div class="elementor-widget-container"> <div class="prismjs-okaidia copy-to-clipboard "> <pre data-line="" class="highlight-height language-javascript ">
<code readonly="true" class="language-javascript">
<xmp> const llmResponse = llm.generateText({
prompt: "List out each item with the price per item and quantity per item. Then get the subtotal, tax total, and total from this receipt.",
documents: [{
id: 'fileId',
data: extractedData.getText()
}]
});
You’ll have results similar to these though they will probably not be exactly the same. Now we have all of the data we need but it’s still not structured into a JSON object. We received a JSON object from documentCapture, but when we deal with documents like receipts there’s not consistency in structure. So how do we create a generic object structure for the receipt data so we always know exactly what the keys will be? We’ll explore using the responseFormat option available in the generateText() method.

Step 7: llm.generateText() responseFormat parameter
With the responseFormat parameter, you can provide a JSON schema and the LLM will return its response in that exact format. You provide an object that represents a valid JSON schema, and the response will contain keys and values as defined in your schema that are populated by the generated content – then you can simply parse the response as JSON.
It’s important to note that we cannot use the responseFormat and the document parameters at the same time or we’ll get an error. Instead of putting our extractedData in the document parameter we’ll put it in the prompt. Then we’ll send the JSON schema in the responseFormat. Update your script file, select ‘restaurant receipt.jpg’ from the file select field in your suitelet, and submit.
             // Step 7 - update the prompt and add exractedData.getText()
        // remove document parameter and add responseFormat
        const llmResponse = llm.chat({
            prompt: "Extract the receipt information from this document: " + extractedData.getText(),
            responseFormat: {
                "type": "object",
                "required": ["date", "items", "subtotal", "taxAmount", "total"],
                "properties": {
                    "date": { "type": "string" },
                    "items": {
                        "type": "array",
                        "items": {
                            "type": "object",
                            "required": ["description", "quantity", "unitPrice", "total"],
                            "properties": {
                                "description": { "type": "string" },
                                "quantity": { "type": "number" },
                                "unitPrice": { "type": "number" },
                                "total": { "type": "number" }
                            }
                        }
                    },
                    "subtotal": { "type": "number" },
                    "taxRate": { "type": "number" },
                    "taxAmount": { "type": "number" },
                    "total": { "type": "number" }
                }
            },
        });
Now we get a JSON object with generic keys matched with the values from the data we captured. This could be used to automate an expense report – for example, you could automatically create expense lines in NetSuite by looping through the extracted data, populate custom fields with the parsed values, or validate expense amounts against company policies before submitting for approval. The structured JSON output makes it easy to map directly to NetSuite record fields without any additional parsing or data transformation.

Conclusion
In this tutorial, we explored how NetSuite’s N/documentCapture and N/llm modules work together to transform unstructured documents into actionable data. We moved from basic text extraction through structured data capture, and finally combined document capture with AI-powered analysis to create consistent JSON output from varied document formats. While N/documentCapture gives you the raw extracted data, N/llm helps you make sense of it and transform it into exactly the format your business processes need – whether that’s automating expense reports, processing invoices, or analyzing contracts. The key is combining good prompt engineering with well-defined response schemas to turn these tools into production-ready automation for your specific use cases.
Author:

Gus Larson
How TAC Can Help
NetSuite’s N/documentCapture and N/llm modules unlock powerful AI-driven automation but implementing them correctly requires more than just writing a script. Poorly designed document workflows can lead to inaccurate data extraction, governance issues, unexpected AI usage costs, and broken downstream processes.
TAC Solutions Group helps you design and implement intelligent document automation the right way aligned with your business rules, approval processes, and financial controls.
From invoice automation and receipt-to-expense workflows to AI-powered document classification and structured JSON output for record creation, we build scalable solutions that reduce manual entry and improve accuracy.
As a NetSuite Alliance Partner, we ensure your AI integrations are secure, optimized for performance, and built to scale within your NetSuite environment. Whether you’re exploring document automation for the first time or looking to productionize an AI proof of concept, TAC is ready to help.


