


How custom records and SuiteFlow can turn a simple rejection into a structured, auditable business process.
NetSuite provides a large set of native records and standard functionality, but every business has processes that are unique to the way it operates. Sometimes a native transaction has almost everything the business needs, but one important piece of the process is missing. That is where custom records come in and save the day.
When Native Records Are Not Enough
A custom record is a record that the business can create that caters to specific business needs. Instead of attempting to fit information into a native or custom field on a record that essentially does not meet your company’s needs, you can create a custom record to capture specific information that the business needs for it’s processes. You can then take the information and create reports/searches to pull data for the process, rather than trying to use native records to attempt to do this.
Custom records can be designed with their own fields, permissions, forms, relationships, and workflows. They can also be connected back to native NetSuite records and are available to view on the record it is linked to. This makes them useful for processes such as exception tracking, approval history, integration logs, supplemental transaction information, and other requirements that do not fit cleanly within a standard record.
A Practical Example: Capturing Journal Entry Rejections
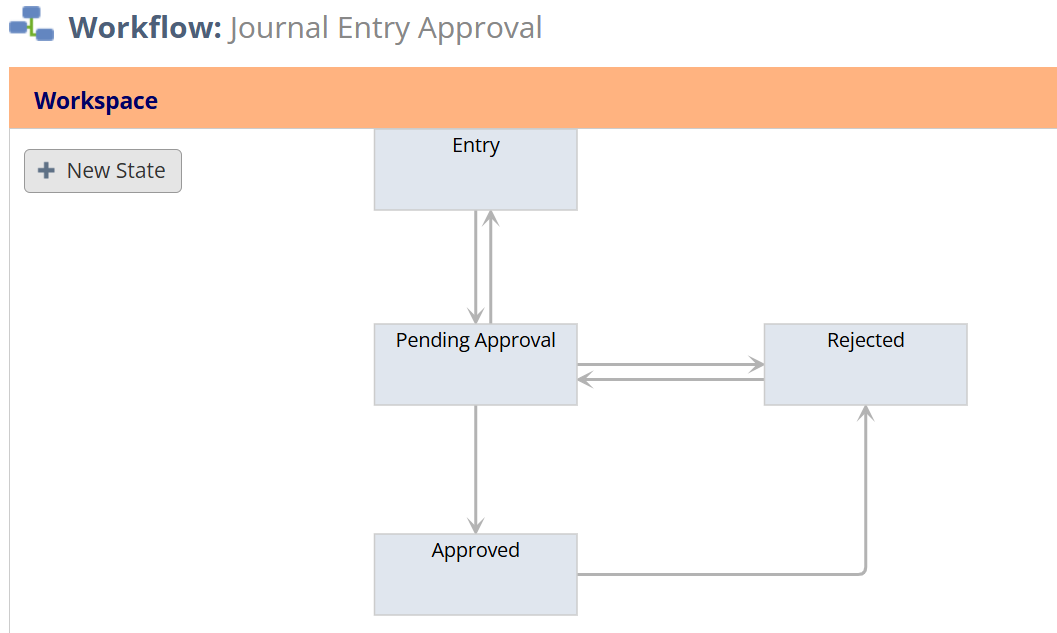
Consider a Journal Entry approval process. The Journal Entry can move through an approval workflow with states such as Entry, Pending Approval, Approved, and Rejected. NetSuite can let you know that the transaction was rejected, but it does not tell you more than the status natively. Finance teams often need to know why it was rejected, who rejected it, when it happened, and which transaction the rejection belongs to, and this is not something that can be easily tracked down without talking to the approver to find out the information. You can certainly add custom fields to the transaction, but this can overload the journal and cause confusion.
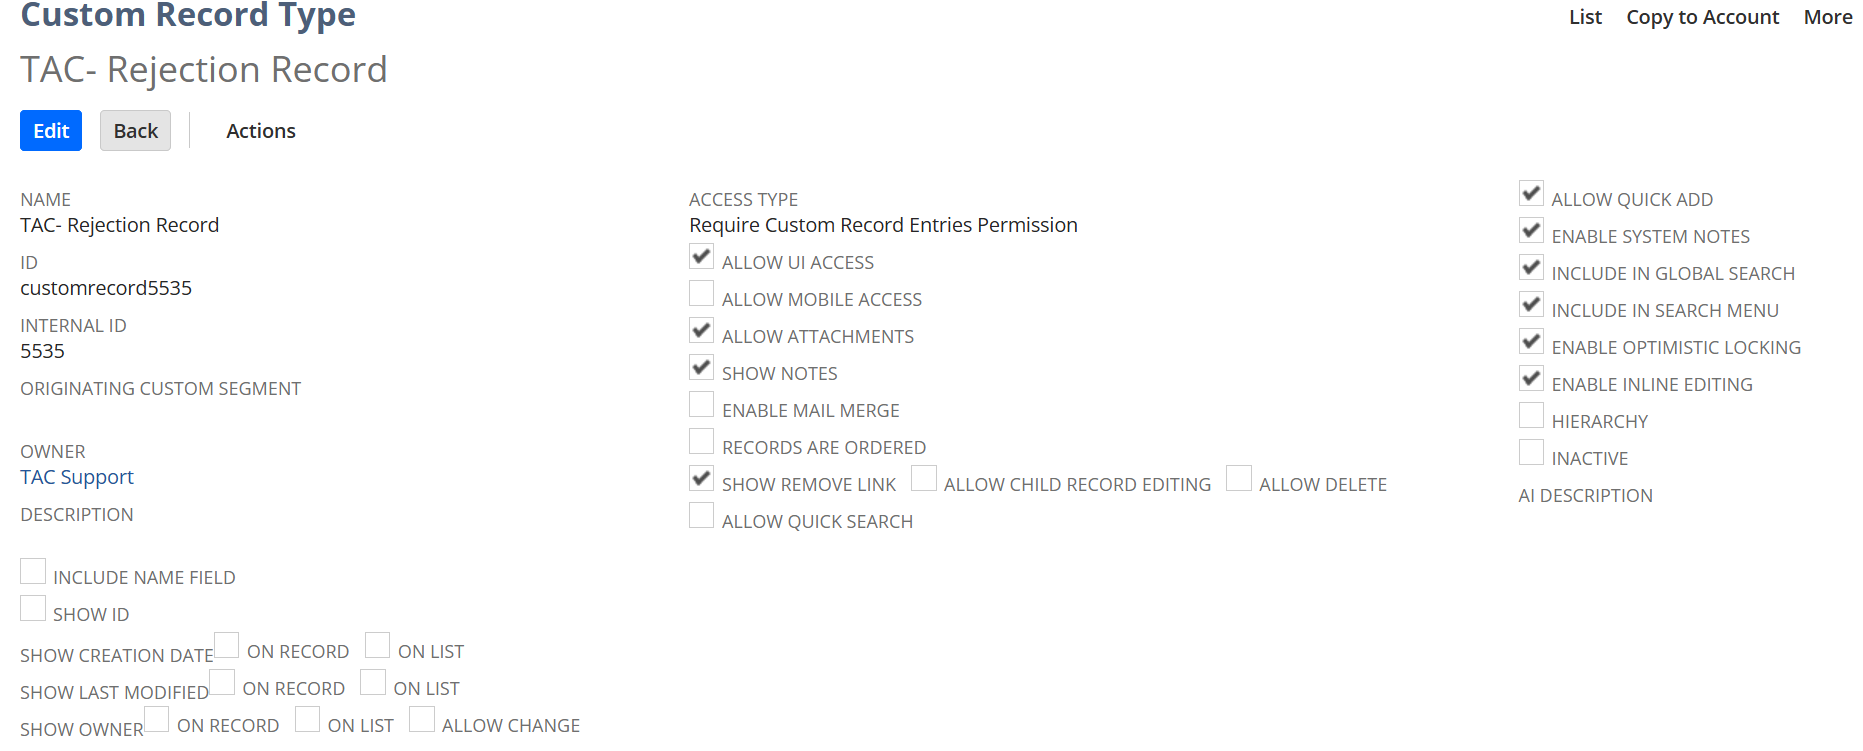
For this solution, a custom record named TAC- Rejection Record was created specifically to store those rejection details. Rather than overloading the Journal Entry with additional approval-history fields, the rejection becomes its own structured record that is linked back to the transaction.
A Practical Example: Capturing Journal Entry Rejections
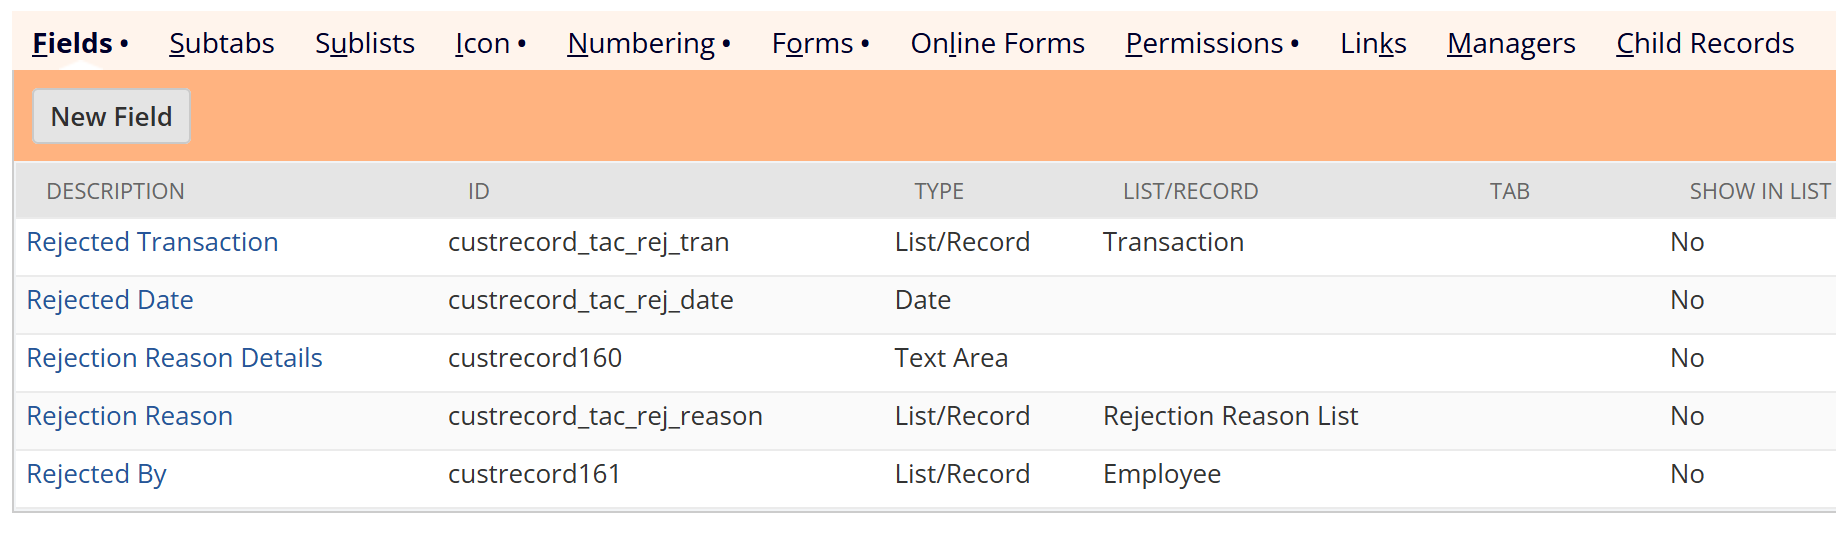
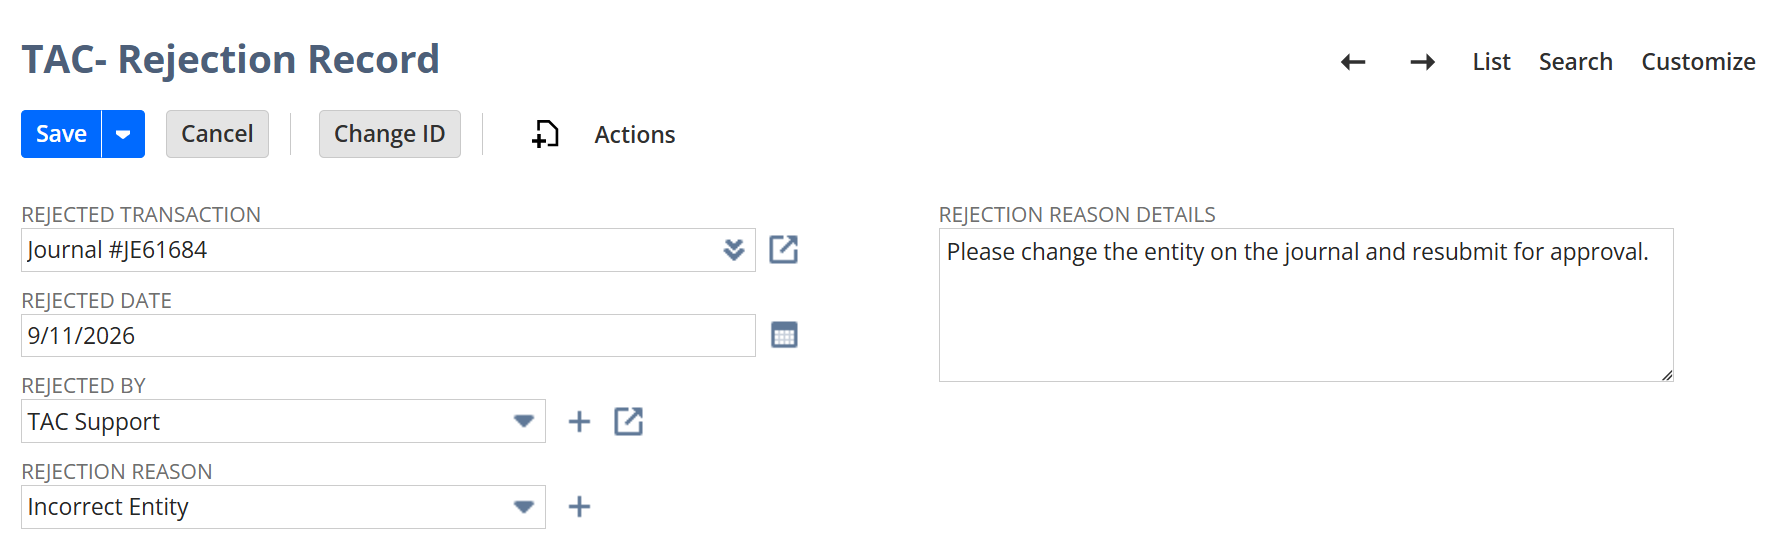
The custom record was kept focused on the information needed to document a rejection and to give the finance team the key information without having to ask around. In this example, it contains five key fields:
|
Field
|
Purpose
|
|---|---|
|
Rejected Transaction
|
Links the rejection record to the transaction that was rejected.
|
|
Rejected Date
|
Captures the date the rejection occurred.
|
|
Rejection Reason Details
|
Provides a text area for additional explanation when needed.
|
|
Rejection Reason
|
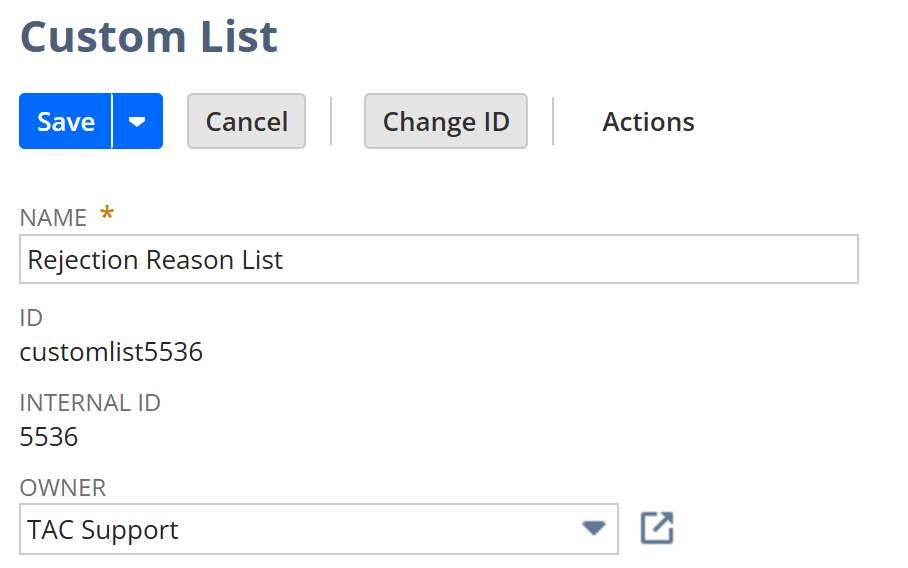
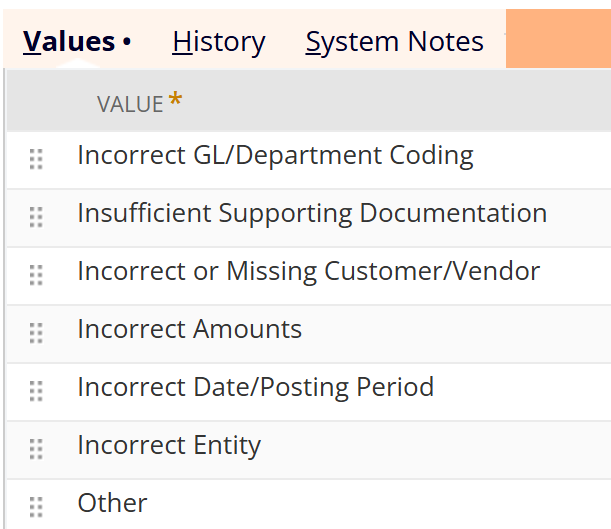
Contains a dropdown of a Rejection Reason List provided by the accounting team for a standard of commonly known issues encountered.
|
|
Rejected By
|
Identifies the employee/user responsible for the rejection.
|
This design gives the business both structure and flexibility. A predefined Rejection Reason can be used for consistent reporting, while Rejection Reason Details can capture context that does not fit into a list value, and can be used for an individual note to the creator on exactly what needs to be corrected. Because the rejected transaction and rejecting user are also stored and can be found on the rejected transaction, the record can become part of a much more useful approval audit trail.
The Journal Entry Approval Workflow
However, the custom record is only one half of the solution. The other half is the Journal Entry approval workflow. In this example, the workflow contains Entry, Pending Approval, Approved, and Rejected states. The transaction can move through the normal approval path, while a rejection sends it into a dedicated Rejected state.
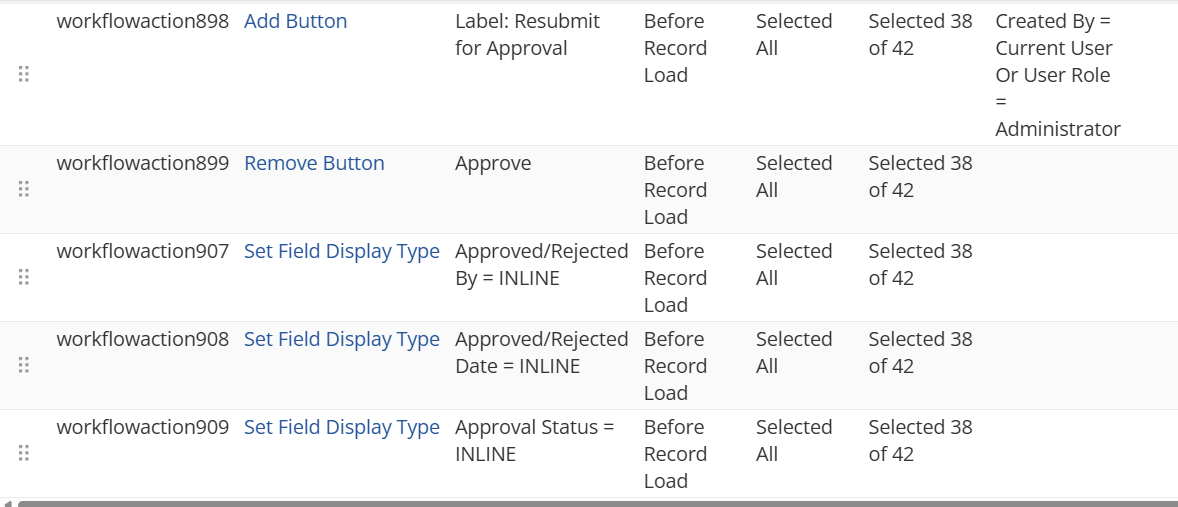
The workflow does more than visually route the transaction. In the Rejected state, it sets Approved to false, automatically records the current user in Approved/Rejected By field, records today’s date in Approved/Rejected Date, and sets the Approval Status to Rejected on the Journal Entry itself. It also removes the standard Approve button, allows the user to edit the transaction, and provides a Resubmit for Approval button once the edits noted in the rejection record have been made. This keeps the transaction’s current approval status synchronized with what actually happened.

Opening the Rejection Record at the Right Time
Where the custom record comes in with this workflow is in the Go to Record action. When the Journal Entry reaches the Rejected state, a Go To Record action opens the TAC- Rejection Record in edit mode. This allows the rejector to edit the custom record form. The workflow passes specific information into the new record automatically: Rejected Date is set to today, Rejected Transaction is set to the current Journal Entry, and Rejected By is set to the current user.
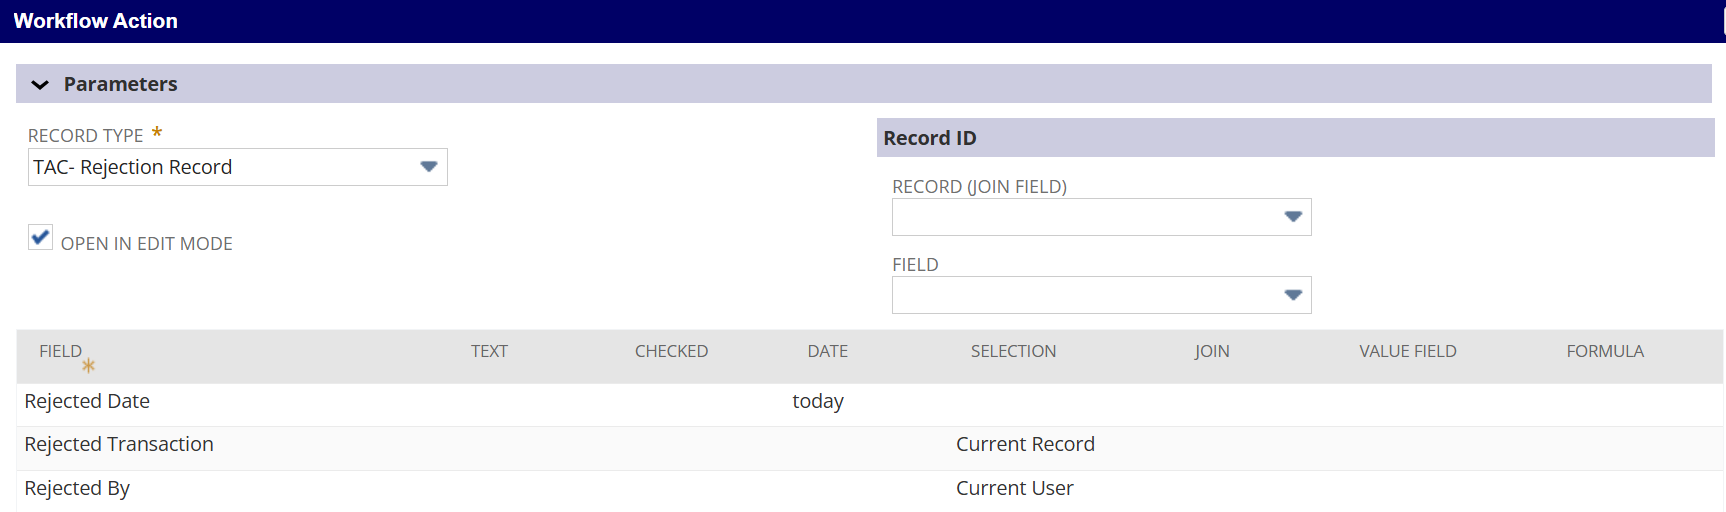
This is an important usability decision. The approver should not have to manually re-enter information that NetSuite already knows. By prepopulating the date, transaction, and user, the approver can focus on the one piece of information the system cannot determine automatically: the reason for the rejection. The user who rejects the Journal Entry can then go into the rejection reason dropdown and add any additional information needed for the user who created the JE.
Using a Second Workflow to Control the Rejection Details
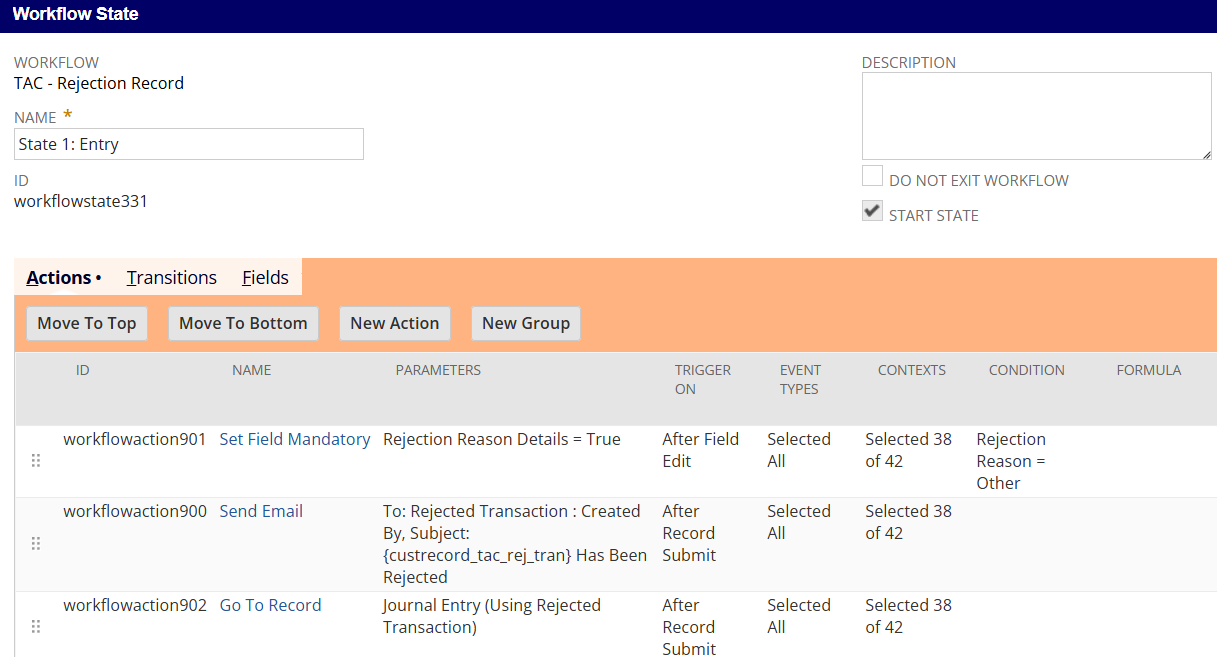
The Rejection Record itself has its own workflow, TAC – Rejection Record, separating the transaction approval logic from the logic governing the rejection record. This design makes it so that the rejection record has its own requirements.
In the Entry state, the workflow makes Rejection Reason Details mandatory when the selected Rejection Reason is Other. This allows for a detailed explanation if the reason is not on the standard rejection reason list dropdown and ensures the user who created the Journal gets the appropriate reason as to why the transaction is rejected.
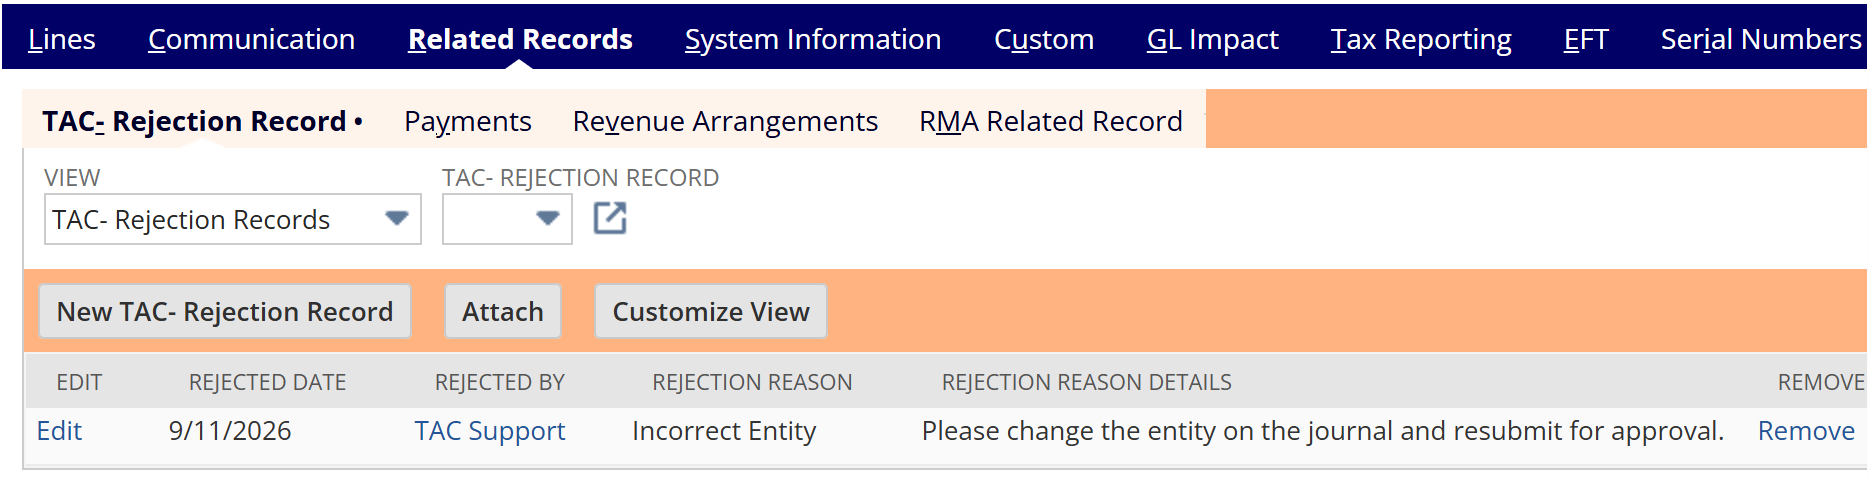
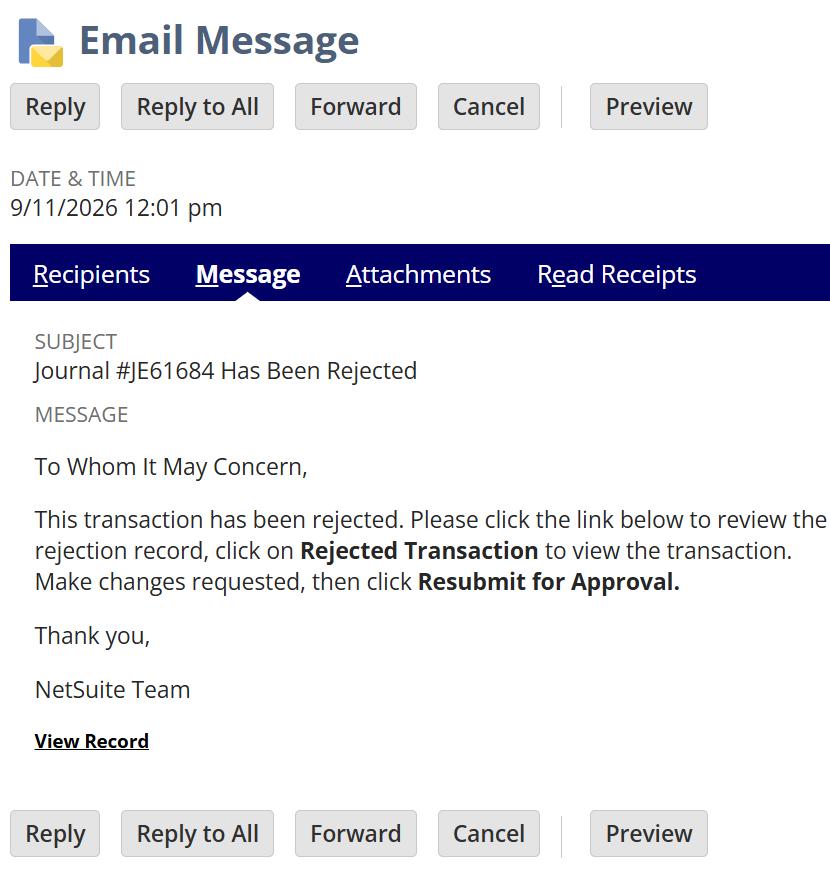
After the rejection record is submitted, the workflow automatically sends an email to the user who created the journal letting them know that the rejected transaction has been rejected. The last Go to Record action returns the user who rejected the record to the journal, and when they are redirected to the Journal, they will see the rejected status, who rejected it, and what date it was rejected, as well as the rejection reason in the related records. The result is a connected user experience instead of leaving the approver on an isolated custom record.

What the Complete Process Looks Like
- A Journal Entry enters the approval workflow and is submitted for approval.
- The transaction moves to Pending Approval.
- If the approver rejects the Journal Entry, the workflow moves the transaction to the Rejected state.
- The Rejected state updates the Journal Entry’s approval-related fields and opens a new TAC- Rejection Record.
- NetSuite automatically populates the rejected transaction, rejected date, and rejected-by user.
- The approver selects a rejection reason. If Other is selected, Rejection Reason Details becomes mandatory.
- The rejection record is submitted, an email notification is sent, and the user is returned to the rejected Journal Entry.
- The rejection record is noted under the related records section of the Journal Entry, and can be used to view the rejection history of the transaction.
- When appropriate, an authorized user can use Resubmit for Approval to send the corrected Journal Entry back through the approval process.
Why Use a Custom Record Instead of Just Another Field?
The larger lesson is not that every missing feature should become a custom record. The goal is to use NetSuite’s native functionality where it fits and extend it only where the business process requires more structure. Custom records are most effective when they solve a clearly defined gap and remain connected to the native transactions users already work with.
In this Journal Entry example, the native transaction continues to do what it does best: hold the accounting entry and move through approval. SuiteFlow manages the approval state and user actions. The custom Rejection Record handles the additional business information surrounding a rejection. Together, the pieces create a process that is more controlled, more reportable, and easier to audit without trying to turn the Journal Entry itself into something it was never designed to be.
The Bigger NetSuite Design Principle
Final Takeaway
Custom records are one of best way to have NetSuite fit a company’s real-world processes. The Journal Entry rejection example shows how a custom record can assist with the approval process, ensuring there is no gap. Instead of the business knowing that a transaction was rejected, they can capture who rejected it, when it was rejected, why it was rejected, and the detailed explanation when necessary. Then, they can see the rejection details from the custom record in the related records of the transaction as well as the email that was sent to the rejected user. By combining a purpose-built custom record with SuiteFlow, NetSuite can provide both the flexibility users need and the control finance teams expect.
How TAC Can Help
At TAC, we help businesses get more out of NetSuite by building solutions that fit the way they actually operate. Whether it’s improving approval workflows, creating custom records, automating manual processes, or enhancing reporting, our team can help identify gaps in your current setup and develop solutions that make your processes more efficient.
Stop working around NetSuite limitations and start building processes that work for your business. Our team can help turn manual workarounds and inefficient workflows into streamlined, automated solutions.
Connect with a TAC consultant today to discover how we can improve and optimize your NetSuite environment.